How to Water a Vertical Garden Without Wall Damage
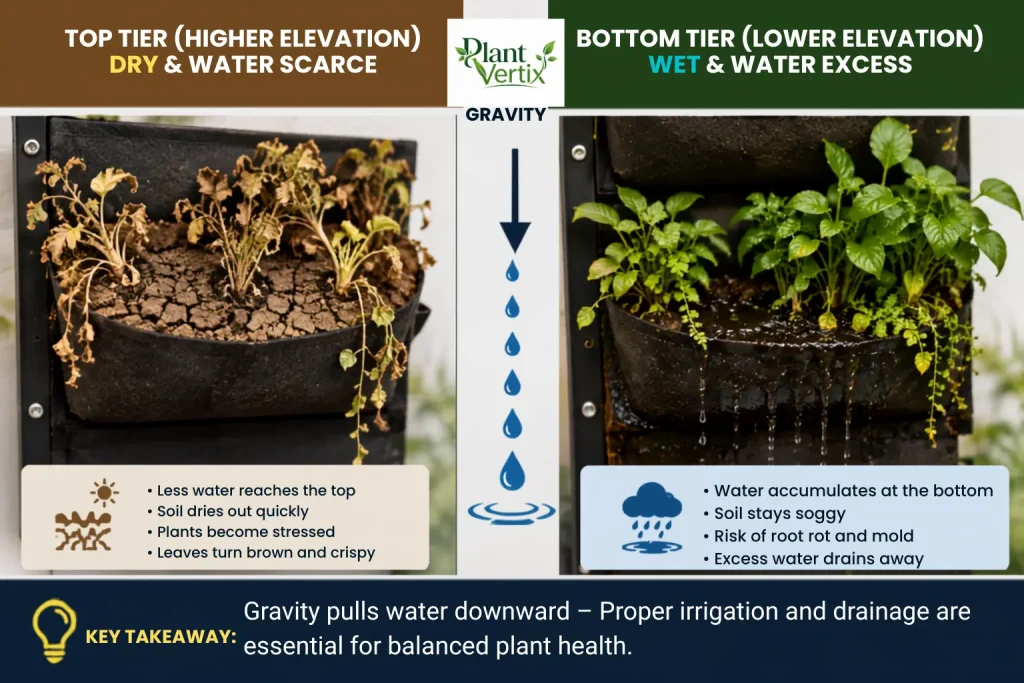
A vertical garden waters unevenly by default because gravity pulls moisture downward through the structure: the top tier dries out fastest while the bottom tier holds onto water the longest. That single mechanical fact, not bad luck, is what causes both a crispy top tier and a soggy, rotting bottom one.
The fix has three parts: water slowly until roughly 10 to 15 percent drains out the bottom as a general guideline, check moisture separately at the top, middle, and bottom instead of judging the whole structure at a glance, and protect the wall behind any mounted system with a moisture barrier and a small air gap.
The Two Ways a Vertical Garden’s Watering Goes Wrong
Most watering complaints about a vertical garden fall into one of two patterns, and they are really two symptoms of the same cause.
- The first is a crispy top: the highest pocket, shelf, or panel row dries out within a day or two of watering, no matter how much water goes in.
- The second is a soggy bottom: the lowest tier stays damp, smells musty, or shows mold or root rot, even when the top looks fine or actively thirsty.
- A third symptom, water streaking or running down the wall itself, is usually the soggy-bottom problem showing up early, before the excess water even reaches the bottom tier.
Once you recognize crispy top and soggy bottom as one structural issue instead of two unrelated problems, the fix stops being “water more” or “water less” and becomes “water differently, tier by tier.”
Why Gravity Makes Every Vertical System Uneven by Default
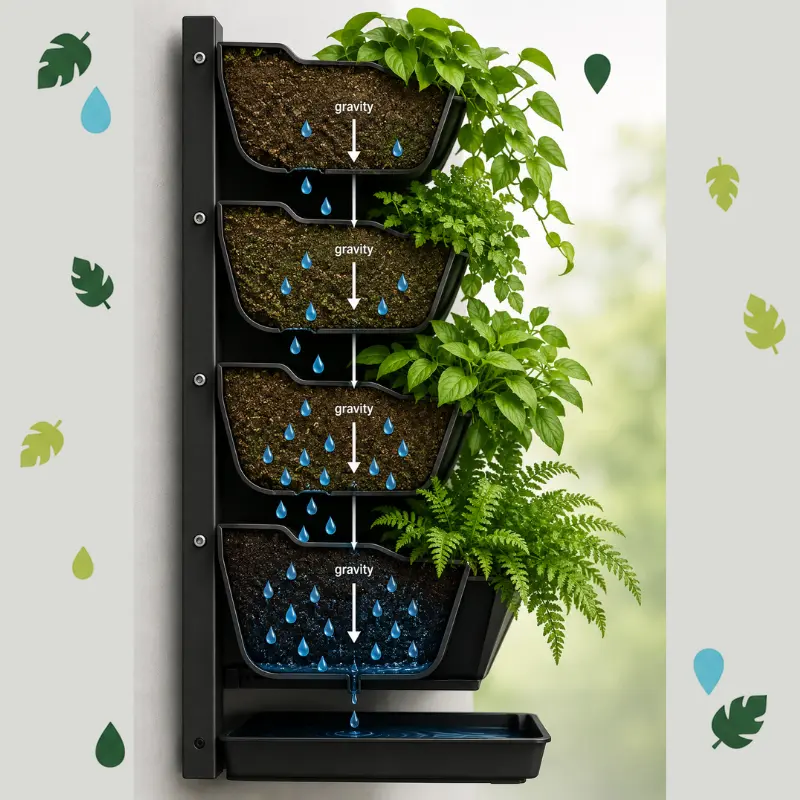
In a stacked, tiered, or pocketed structure, water applied near the top has to travel down through every layer below it before it reaches the bottom. The top tier releases moisture to gravity almost as soon as it absorbs it, so it dries fastest. The bottom tier receives its own water plus whatever drained through everything above it, so it stays wettest longest, sometimes long after the top has already gone dry.
This is a structural reality of gravity-fed vertical growing, not a sign that you are doing something wrong. A watering schedule built for a single potted plant on a table will overwater the bottom tier and underwater the top tier of a vertical structure, because a single pot never has to answer for what several tiers stacked above it did to the water on its way down.
Protecting The Wall Behind a Mounted System
Before troubleshooting the watering itself, confirm the wall behind a mounted structure is actually protected, since a watering routine cannot fix a wall problem.
The standard approach is a moisture barrier (a water-resistant board or membrane) fitted between the structure and the wall, plus a small air gap that lets trapped moisture evaporate instead of sitting against paint, plaster, or drywall. Skip that barrier and gap, and even a well-managed watering schedule can eventually leave discoloration behind the structure.
Freestanding and no-drill structures sidestep this concern almost entirely, since nothing is mounted directly against a wall. For the full step-by-step version of the wall-protection setup, see our complete guide to building a vertical garden for a small space.
How Much to Water, and How to Tell It Is Working
A commonly used general guideline is to water slowly until roughly 10 to 15 percent of the water applied drains out the bottom. Treat this as an estimate to confirm the whole structure got wet without waterlogging it, not an exact target; the right amount varies with pot size, growing medium, plant load, and weather.
The more reliable check is tier-by-tier, not whole-structure. A single glance at a vertical garden almost always favors the top tier, since it dries visibly and looks either healthy or thirsty first. That glance misses what is happening at the bottom. Instead:
| What you are seeing | Likely cause | What to check first |
|---|---|---|
| Top tier crispy, lower tiers look fine | Gravity pulls water down before the top tier can absorb it | Give the top tier its own supplemental watering pass, or add a drip line to it specifically |
| Bottom tier soggy, moldy, or rotting | Runoff from every tier above is collecting there | Confirm the bottom containers or pockets actually drain, not just the tiers above them |
| Water streaking or running down the wall | Water is applied faster than the drainage path can carry it away | Slow the water rate, and confirm a moisture barrier and drainage channel exist behind the structure |
| Structure looks dry on top, feels swampy underneath | Watering decisions are made by sight alone, not by tier | Check moisture at the top, middle, and bottom separately, not the structure as a whole |
A simple finger test (moist soil an inch or two down) or a basic soil moisture meter, checked at all three zones rather than just the top, catches an uneven pattern long before it becomes a visible symptom.
When a Drip or Wicking System is Worth Adding
Hand watering is enough for a small setup, a few tiers with a manageable number of pockets or containers you can check and water in a few minutes. Past that size, a drip or wicking system starts to earn its complexity.
A drip system delivers small, controlled amounts of water directly to individual pockets through low-flow emitters, usually on a timer, so each zone gets its own dose instead of relying on gravity to redistribute one big watering.
A wicking system works differently: a fabric wick or capillary matting draws water upward from a reservoir into the growing medium as it dries, rather than water being poured in from above. This suits smaller, lower-water-demand setups better than large, multi-tier structures.
What watering technique alone cannot fix: a structure with no real drainage exit anywhere, sealed pockets with no weep hole, or a container with no drainage hole, will not be solved by any watering schedule; the structure itself needs to change first.
Wall discoloration or moisture that has already reached paint, plaster, or drywall is a repair question for a qualified contractor, not something a watering adjustment undoes. Different structure types also drain differently by design; our comparison of vertical garden systems breaks down what to expect from each before you troubleshoot a symptom that is really a structure mismatch.
Matching Plant Position to Watering Reality
Sometimes the real fix is not a more precise watering schedule at all; it is moving the plant. A moisture-loving plant placed on the fast-drying top tier will struggle no matter how attentively you water it there, and a drought-tolerant plant stuck on the perpetually damp bottom tier is prone to root rot regardless of your watering skill.
Before assuming your watering technique is the problem, confirm the plant is even suited to the tier it is sitting on. Our tier-by-tier plant guide covers which plants tend to handle the fast-drying top, the balanced middle, and the consistently damp bottom, so you can match the plant to the physics instead of fighting it indefinitely.
Signs of Overwatering VS Underwatering on a Specific Tier
Overwatering on a tier usually shows up as soil that stays dark and wet for days after watering, a musty or sour smell near that tier, yellowing on lower leaves, visible surface mold, or roots that look brown and soft where you can see them.
Underwatering on a tier usually shows up as soil pulling away from the container’s edge, leaf tips crisping and browning inward, or wilting that does not recover within a few hours of a normal watering.
Because these signs can appear on one tier while the rest of the structure looks completely normal, checking tier by tier rather than glancing at the whole structure is what catches the problem while it is still small.
A Simple Weekly Watering Routine
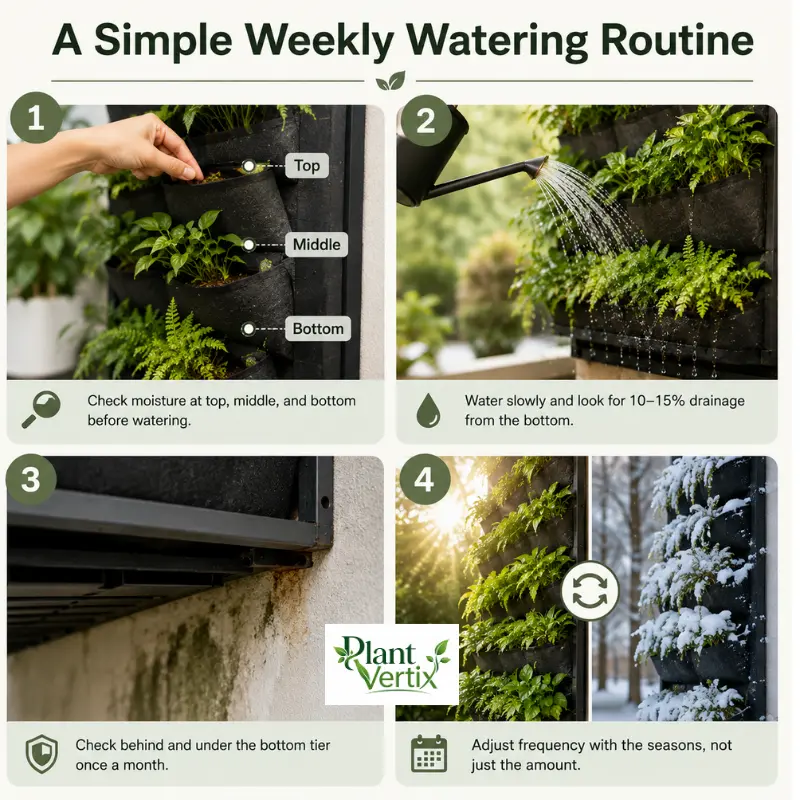
- Once a week (more often in hot or dry weather), check moisture at the top, middle, and bottom tiers before deciding whether to water at all.
- Water slowly, pausing partway through, and watch for roughly 10 to 15 percent drainage from the bottom as a sign the whole structure got wet.
- Once a month, look behind and underneath the bottom tier for standing water, wall discoloration, or a musty smell, which catches a wall or drainage issue early, before it becomes a repair.
- Adjust the schedule seasonally by frequency, not just amount; a hot, dry stretch usually calls for checking more often rather than dumping more water in at once.
FAQ
Why is water running down my wall from my vertical garden?
Water usually runs down the wall when it is applied faster than the drainage path can carry it away, or when the moisture barrier and air gap behind the structure are missing or damaged. Slow the watering rate first, then confirm the barrier and drainage channel are in place.
Why does only my top tier look healthy?
Gravity pulls water down through a vertical structure faster than the top tier can absorb it, so the top often looks healthiest while quietly needing more frequent attention. Lower tiers hold onto excess moisture and can look fine until a soggy or rotting problem shows up later.
Do I need a drip system, or is hand watering enough for a small setup?
Hand watering is enough for a small structure with a manageable number of tiers you can check in a few minutes. As a structure grows larger or taller, a drip system that doses each tier individually becomes worth the added setup.
How do I check if one tier is getting too much water?
Check that tier’s soil with a finger test an inch or two down, or a moisture meter, rather than judging it against the rest of the structure. Soil that stays dark and wet for days, smells musty, or shows surface mold is getting more water than it can use.
How often should I water a vertical garden?
There is no single universal number; it depends on plant choice, growing medium, tier position, and weather. A weekly moisture check at the top, middle, and bottom tiers, adjusted more often in hot or dry stretches, beats a fixed schedule.
Getting the watering right works best alongside the wall-protection step, the structure choice, and the tier-based plant matching covered in our complete build guide for a vertical garden in a small space.